Monday, November 23, 2009

Process of creating a Luminair

I was experimenting with how light shined through paper. I really liked the texture of the construction paper that you can see when the light shines through it. I was also experimenting with projecting a pattern on a surface. Which in shown in the image bellow.

When I added another start peice the patter on the ceiling became more interesting.
I wanted to make my luminair larger in order for it to show gradation in the light. I discovered that bond paper had a very similar textur to the construction paper but it allowed me to make the scale of my lunimair larger because on the size on the bond paper.
As i was working with my base I decided to make it a cube. I left the back open so that you can switch the light on and off but the light was leaking out way too much so i eventually but a flap door on in.


Inspiration

This is a picture of the light on my bedroom ceiling. I really like the light field it produces. This makes me want to try and project something that will make a pattern on a surface.


These pictures are all of sunsets but for my inspiration I did not so much focus on the colors of the sky but rather of how the light faded from light to dark. With this I want to try and capture the gradual change in the brightness of light.


Sunday, November 8, 2009

perspective drawing


This was my first attempt at drawing in one point perspective. I was having difficulties with how things turned out looking and how I perceive them in real life. It made me think that what I was doing was wrong. Other than that I did not struggle. for this perspective I drew the contour in pen then shaded with pencil. I am pleased with how it turned out, but I know i can improve on my shading.

Friday, November 6, 2009

Junk Drawer


The junk drawer was a poject to help with cross hatching and shading. I had never done crooshatcihng before this so i learned a lot. The most difficult part was keeping the lines consistent with how spaced out they were and keeping then straight. With this project I came to realise that the more contrast the better.

Floating cubes

The floating cube project was to practice working in one point perspective. this really helped because it was simple but it was a lot of practice. The most difficult part of this assignment was making the objects in perspective but shading them really helped them stand out and look three dimensional.

Friday, October 30, 2009

Comparing and contrasting

#1
This model has a full dome then an angular backboard surrounding the back of it which looks like is is going to curve in. Both spaces are defined and easy to pick out but I am not sure what the dialog is.
#2
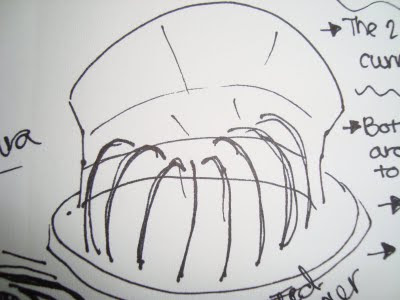
This models is very circular and the skewers curve into the centers while the shell covers it. They both sort of meet in the middle. I can see the dialog as coming together. Everything about this model works together.
Both of these models have a lot in common. They both bent their skewers in order to form a dome shape and the the Bristol board is formed around the dome. Both spaces in each model are defined with curves.


Understanding DIALOG: orthographic drawing

Orthographic drawing
Plan


Front elevation


Section elevation


Right elevation


Understanding DIALOG

My parti/collage consists of my ideas of how I was going to create two spaces using twelve 4"x6" pieces of Bristol board and twelve wooden skewers in order to create two spaces with dialog. My main idea was thing 1 and thing 2. The idea of them both being identical and both working together is what I considered to be a good dialog.
For my sketch model I made a cube using the 12 skewers and divided it using Bristol board. To emphasize my two space I built the cube to where you can separate each triangular side and see the two distinguished spaces by themselves.

In my next model I still have the cube idea but it is made with completely right angles. Also I did not cut out each individual 4"x6" card. I cut out sheets of the Bristol boars which measured 12"x6", and I scored so that you can see each 4"x6" card.


When I overlapped both 12"x6" sheets of Bristol board i them decided to bring the skewers in and have them following the seem. This made the skewers be more related to the Bristol boars and bring more unity to my project.


For the final model the angle are not square. The skewers at an angle make the model more interesting. The dialog in my model is created when both halves ( thing 1 and thing 2) are working together to create the cube.


Thursday, October 15, 2009

GreenPepper


This was my first orthographic grawing. It was very intimidation but once i started it wasn't as hard as a looked.


understanding UNITY


This is my parti/collage of how i developed my ideas. I wanted an airy feeling to my projects, i wanted the paper airplane to look like it was flying. I also had the idea of evolution which is what I use to connect my project to unity. Things can transform and come together to make something else.


My idea of unity was the evolution of a paper ball into a paper airplane. My first idea was to make two sets of the process and have them going in opposite directions like an "X". This was a good idea but I didn't like how it looked.


My second idea was to have the two sets of the evolution forming a circle on my base. I chose to use plexi glass as a base to give the planes an airy feeling. The paper ball is the lowest point on the circle, which then transforms in a upward motion giving my project a moving and flighty feeling.


Sticks and Cell Phone Models


After we built the models we had to choose our favorite and do an orthographic drawing and a perspective. In my perspective i decided to imply that my structure was very large compared to the human scale. I can see people walking through it.


For this assignemnt we had to get inspiration from a series of drawing we did with sticks and cell phones. This was actually really fun because you could really be creative and we were able to use what we drew to make our models.